
Rewiring Movement and Pain
How Your Nervous System Shapes the Way You Move
When it comes to pain, stiffness, or movement restrictions, most people think the problem lies in muscles, joints, or bones.
But here’s the surprising truth: movement is controlled by your brain and nervous system, not just your muscles.
If your brain perceives a movement as unsafe, it will protect you — even if there’s no actual injury — by creating pain, stiffness, or reduced range of motion.
This is why someone might say, “I just got up from the chair, and my back went!”
The back didn’t suddenly “break”; it was your nervous system signalling danger and putting on the brakes.
Your Cranial Nerves – The Body’s Super highway
You have 12 pairs of cranial nerves that act like high-speed motorways between your brainstem (the control center at the base of your brain) and the rest of your body.
The brainstem — particularly the Pontomedullary Reticular Formation (PMRF) — acts like a traffic controller, constantly regulating:
Muscle tone
Posture and balance
Reflexive, protective actions
Every cranial nerve matters because they’re all influenced by your “threat bucket” — the collection of stressors and life factors that your nervous system is constantly monitoring.

Here are the 12 cranial nerves and what they do:
The Threat Bucket – Why Pain Is Personal
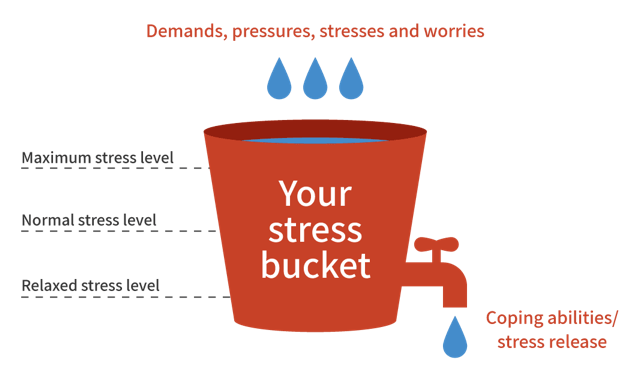
Think of your nervous system like a bucket.
Every stressor you experience adds water to the bucket:
Environment (e.g., noise, toxins)
Past injuries or traumas
Daily stress
Relationships
Finances or career worries
Poor diet or food sensitivities
Negative beliefs or values
When your bucket overflows, your nervous system sees danger and creates protective responses, like:
Pain
Stiffness
Fatigue
Movement restrictions
The good news?
You can empty the bucket by lowering your perceived threat through simple, powerful tools:
Breathwork → activates the parasympathetic nervous system (your “rest and recover” mode) and even helps free fascial restrictions.
Massage or bodywork → calms your nervous system and releases tension.
Scar tissue therapy → restores proper movement and posture disrupted by old scars.
Meditation & mindfulness → strengthens the Vagus nerve and reduces stress.
Strength training → gives your body more resilience and stability.
Talk therapy & reframing → helps heal past trauma and reduce psychological threat.
Pain Is a Signal, Not Always Damage
Pain doesn’t always mean something is broken.
It’s your brain’s warning light, telling you to do something differently.
Research shows this clearly:
Dr. James Andrews scanned 31 perfectly healthy baseball players with no pain or injury.
90% of their MRIs showed abnormalities — things that might normally be considered “surgical.”
This proves that pain isn’t always about structure; it’s often about how your brain interprets safety.
How Neuro Exercises Can Unlock Pain-Free Movement
Traditional stretching and strengthening are great, but if your nervous system still feels threatened, your progress may stall.
This is where neuro drills come in.
Neuro exercises give gentle, precise sensory input to the nervous system, teaching it that movement is safe.
They can:
Improve communication between your brain, spinal cord, and muscles.
Reduce protective muscle tension.
Increase proprioception (your awareness of where your body is in space).
“Re-map” brain areas linked to stiff or painful regions.
Especially Helpful For:
Chronic pain with no clear cause
Tightness that never improves with stretching
Stiffness after an injury
Neurological conditions like stroke or nerve impingement
Anxiety-related pain or high stress
The Visual System – Your Body’s Dominant GPS
Your eyes are deeply connected to your posture, balance, and movement.
Around 70-80% of your balance and posture relies on vision.
If one eye tracks slower than the other, your brain compensates, often by tightening neck or spine muscles, which can cause pain.
Your visual system is reflexive, meaning most of its work happens automatically — but it still needs training and practice to stay efficient.
Example:
If you turn your head quickly but your eyes don’t stabilize well, the world may blur.
Your brain sees this as unsafe and instantly tightens your core and neck muscles to protect you.
Training your visual system can improve balance, reduce pain, and restore range of motion — especially when stiffness is protective rather than structural.
PMRF Activation – Your Stability Hub
The Pontomedullary Reticular Formation (PMRF) thrives on reflexive, sensory input.
Simple drills can wake it up and restore natural stability:
Eye movements – slow, controlled horizontal or diagonal eye drills.
Head turns – gently turning your head while focusing on a fixed point.
Cross-body patterns – crawling, marching, or gentle cross-crawls.
Balance drills – standing on one leg with eyes open or closed.
Even a few minutes of this kind of training can:
Improve balance
Reduce muscle tension
Unlock stiff, painful movements
Next Step: Try It Yourself
I’ve put together a short video demonstrating safe, beginner-friendly neuro drills to help you start retraining your nervous system.
These exercises can help calm pain, improve your posture, and unlock movement — all without forcing a stretch or heavy workout.
Final Thought
Your nervous system is the master controller of your movement and pain.
By addressing neural pathways, not just muscles or joints, you can unlock freedom of movement, reduce pain, and feel more stable and confident in your body.
Pain is not a life sentence — it’s just your brain asking for a different approach.
Pencil Push-Ups
For eye coordination and focus
Purpose:
This exercise strengthens your eye muscles and helps improve focus, especially if you experience tired eyes, headaches, or difficulty concentrating.
Instructions:
Starting Position
Stand (or sit if needed) in a comfortable, balanced position.
Feet can be hip-width apart for stability, or together for a bit more challenge.
Relax your shoulders and keep your head still throughout the exercise.
Set Up Your Target
Hold a pen or pencil at arm’s length directly in front of your eyes, at eye level.
Focus on the tip of the pen or a small letter written on it.
The Movement
Slowly move the pen straight in toward the bridge of your nose, keeping your focus on the tip.
Stop moving when the image starts to go double. It’s okay if it gets blurry, but stop before you see two of the target.
Slowly move the pen back out to arm’s length while staying focused on it.
Repetitions
Perform 5–7 repetitions, moving slowly and with control.
Rest for 30 seconds if your eyes feel strained before repeating.
Tips for Success:
Breathe normally and don’t tense your neck or shoulders.
If you experience eye fatigue or a headache, stop and rest, then try again later.
Aim to practice 1–2 times per day for best results.
Vestibula-Ocular Reflex (VOR) Test & Exercise
For balance, focus, and reducing dizziness
Purpose:
This exercise helps train your eyes and inner ear (vestibular system) to work together. It’s especially helpful for improving balance, reducing dizziness, and sharpening focus.
You’ll test and track how your body responds using the Better, Same, Worse (BSW) method.
Step 1: Prepare
Find a safe, quiet space where you won’t bump into anything.
Stand or sit comfortably with good posture and feet hip-width apart.
Have your VOR chart ready and place it at eye level, about arm’s length away.
If you don’t have a printed chart, write a large, clear “M” on a piece of paper.
Step 2: How to Perform the Test
You’ll move your head, but keep your eyes locked on the “M” the whole time.
Right Side:
Focus on the “M.”
Move your head to the right, then return to center.
Repeat 3–5 times slowly and smoothly.
Notice how you feel, then record it:
B – Better: clearer vision, less dizziness, feels easier.
S – Same: no noticeable change.
W – Worse: more dizziness, blur, or discomfort.
Left Side:
Stay focused on the “M.”
Move your head to the left, then return to center.
Repeat 3–5 times.
Record your response: B, S, or W.
Step 3: Using Your Results
B (Better): This exercise is good for you — keep practicing it.
S (Same): Neutral — you can still practice, but monitor for changes over time.
W (Worse): Stop this movement for now and reassess later or try a gentler variation.
Extra Tips:
Keep your movements small and controlled — speed will come later.
Breathe normally and don’t hold your breath.
Practice in short sessions: 1–2 sets per side, 1–2 times per day.
If you feel dizzy, pause, sit down, and rest before continuing.
Around the World
For tongue strength, swallowing, and oral health
Purpose:
This exercise strengthens the intrinsic and extrinsic muscles of your tongue, which helps improve:
Speech clarity and articulation
Swallowing function
Overall oral health and coordination
You’ll use the Better, Same, Worse (BSW) method to track your progress and response.
Instructions:
Starting Position
Keep your mouth closed and lips gently sealed.
Teeth should be slightly apart with a relaxed jaw.
Movement
Place the tip of your tongue on the upper right front tooth (outside of the tooth).
Slowly trace your tongue along the outer surfaces of your upper teeth, moving toward the back molars on the right side.
Slide your tongue down to your lower right molars, then move across to your lower left molars.
From there, travel up to your upper left molars, and finally return to your starting point at the upper right front tooth.
This completes one full circle around the inside of your mouth.
Repetitions
Perform 3–5 full circles in this direction.
Optional: Reverse direction and repeat.
Track Your Results (BSW):
After completing the exercise, notice how your mouth, tongue, or throat feels and record your findings:
B = Better: Feels easier, smoother, or more coordinated.
S = Same: No noticeable change.
W = Worse: Feels more difficult, uncomfortable, or tiring.
Move slowly and smoothly — no rushing.
Keep breathing calmly through your nose.
If you feel tired or sore, pause and rest before continuing.
Practice once or twice per day for best results.
Trigeminal Nerve Glide – Tensioning Sequence
For facial nerve mobility, jaw comfort, and headache relief
Purpose:
The trigeminal nerve controls sensation in the face and jaw muscles.
When it becomes irritated or restricted, you may experience:
Jaw tightness or clicking
Facial tension or tingling
Headaches or sinus pressure
This gentle glide helps mobilize the nerve, reduce discomfort, and improve coordination.
Instructions
Important: Move slowly and gently.
Stop immediately if you feel sharp pain, increased tingling, or dizziness.
Mild stretching or warmth is okay — pain is not.
Step 1: Starting Position
Sit or stand tall and relaxed, with shoulders down and neck long.
Keep your mouth gently closed, lips soft, and teeth slightly apart.
Eyes look straight ahead.
Step 2: Set the Position
Cervical Side-Bend:
Gently tilt your head sideways, bringing your ear toward your shoulder.
Example: Tilt right ear to right shoulder.
Jaw Movement:
With head tilted, slowly open your mouth halfway, keeping the motion smooth.
Imagine your jaw dropping down and slightly forward.
Eye Movement (Optional Progression):
Keeping your head still, look toward the ceiling with just your eyes.
This increases the stretch slightly — only do this if comfortable.
Step 3: The Glide
From this position, gently move your jaw in and out of the stretch:
Open halfway → return to relaxed closed position.
Maintain head tilt throughout.
Perform 5–7 slow, controlled repetitions.
Switch sides and repeat.
Track Your Results (BSW):
After completing the exercise, notice how your jaw, face, or head feels and record:
Trigeminal Nerve Glide
B = Better: Feels looser, easier, or more comfortable.
S = Same: No change noticed.
W = Worse: Feels tighter, more painful, or uncomfortable — stop and reassess.
Simple Eye Exercises to Keep Your Vision Healthy 👀
Backed by Stanford research!
Did you know your eyes have muscles — just like the rest of your body?
And just like any other muscle, they can get tired, stiff, or out of shape.
The good news? With just a few minutes a day, you can train your eye muscles to stay sharp and flexible.
Dr. Jeffrey Goldberg, Chair of Ophthalmology at Stanford University, has shown that these two simple exercises can make a big difference for your vision and overall wellbeing.
No gadgets. No gimmicks.
Just you and a little daily practice.
1. Near–Far Focus Training
This helps your eyes switch focus smoothly between things that are close and far away.
It’s great for reducing eye strain from phones, computers, and reading — and helps keep your eyes flexible as you age.
How to Do It:
Hold a pen, pencil, or your thumb at arm’s length in front of your face.
Focus on it for 2–3 seconds.
Then shift your focus to something far away — like a picture on the wall or a tree outside — and focus there for 2–3 seconds.
Slowly switch back and forth between the two.
Repeat 10–15 times, moving at a calm, steady pace.
💡 Tip: Try this once or twice a day, especially after screen time.
2. Smooth Eye Tracking
This trains your eyes to move smoothly, which helps with:
Reading
Balance
Coordination
Reducing headaches or neck tension
How to Do It:
Hold a pen or small object at arm’s length in front of your nose.
Keep your head still — only your eyes move.
Slowly move the object side-to-side, watching it with your eyes.
Do 5–7 slow passes each way.
Repeat up-and-down for another 5–7 passes.
Rest for a few seconds if your eyes feel tired or watery.
Why These Exercises Matter
Your vision affects everything — balance, movement, focus, and even how relaxed your neck and shoulders feel.
These exercises can help:
Reduce eye strain
Improve focus
Support better movement and posture
Just a few minutes each day can make a big difference!
Quick Recap
Near–Far Training: Switch focus between close and far objects, 10–15 times.
Smooth Eye Tracking: Slowly follow a moving target side-to-side and up-and-down.
Do these once or twice a day, especially after long periods of reading or screen time.